Friday, September 21, 2012

Garden Lesson: Fruit Trees

I've been lax in posting the weekly garden lessons from Crown Gardens lately.  For the last 3 weeks, I've been writing about fruit trees.  I'm going to consolidate the posts into one here.  I hope you enjoy it and if you have your own perspectives or questions, post them in the comments!  I'm always happy to learn new things.

From 9/6/2012:
With fall coming, we have a second opportunity to plant trees.  This week I want to discuss how fruit trees are sold.  When you buy a new tree, it will come in one of 3 conditions:  bare root, potted or freshly dug up.  Each has its pros and cons. 

·         Bare root – these are usually trees between 2-3 years old that have been grafted the previous growing season.  If you are ordering from a catalog or on-line, odds are good you will get a bare root tree.  Bare root trees offer the greatest selection at a reasonable price.  Pros:  The tree is young and usually transplants well.  The roots will not have been root bound and you can get a good look at them before planting.  The tree will likely establish and grow better in the long term.  Cons:  These are young trees and they will likely not bear fruit for several years (2-5 depending on size and variety).
·         Potted – this is what you find at most garden centers.  The trees are usually older (4-5 years).  Pros:  Trees are more established and will bear fruit sooner (usually 1-2 years).  They look nicer when planted.  Because you are picking these out live, you have more choice over the branch structure and shape of your tree.  You can sometimes find good potted trees at the end of the season for cheaper than a bare root tree.  Cons:  the tree is usually root bound.  If the roots have started growing in a curve around the sides, then they must be straightened back out so that they don’t choke the tree later.  Sometimes if a tree has been potted up several times (i.e. never grown in the ground) then roots close to the trunk will swirl even if the ones on the outside don’t.  That can then kill the tree as the roots grow.  You can avoid this by buying trees that are not root bound and look a little small for the size of pot they are in.
·         Freshly dug – These trees are growing in the ground and are dug by a special machine when you order them.  These are usually larger trees that are more expensive.  Some nut trees can be purchased this way, but not usually fruit trees.  Pros:  The tree is established and will have good, straight roots.  It will likely already be bearing fruit.  Because you are likely picking this tree out, you get your choice of branch structure and shape.  Cons:  These are EXPENSIVE!  They also require special equipment to plant them and a very large hole.

When looking for fruit trees, I generally buy bare root trees.  I would never buy a fruit tree from a big box garden center (Lowes, Home Depot, Wal-Mart) because they are always root bound.  I’ve gambled and lost on that one.  There are good smaller garden centers that grow their own stock from bare root and offer wonderful potted trees though.  I keep my eye on them as the season ends because I can usually find good quality trees for $20 each.  I don’t have the budget for freshly dug, larger trees and I think that trees do better when they are in their final spot earlier in their lives.  Plenty of people do buy the larger trees this way though and it works for them.  Ultimately, it is up to what you want and what you’re willing to pay. 

If you’re looking for good trees on-line, I highly recommend Trees of Antiquity (http://www.treesofantiquity.com/) and Stark Brothers (http://www.starkbros.com/).  Trees of Antiquity offers a tremendous selection and really stands by their products.  The only downside with them is that there are so many choices!  Stark Brothers is based out of Missouri, so their trees tend to do well in our climate.  They have a reasonable selection of good trees and their shipping is very reliable. 

Next week, we’ll look at how to evaluate a fruit tree’s structure.

From 9/14/2012:
With fall coming, we have a second opportunity to plant trees.  Let’s discuss how to evaluate a fruit tree’s structure.  The structure of a tree is the pattern that its branches make with the trunk.  For most fruit trees (cherries and plums are an exception), we want an “open” structure that allows air to circulate easily around all the fruit.  The circulation enables the fruit to ripen more uniformly and helps keep mold and mildew at bay.  Here’s what to look for when evaluating a fruit tree:
·         Are branches spaced evenly around the tree?  You don’t want all the branches on one side.  Ideally, you’ll have the same number of branches pointing in all directions around the tree.  If there are branches on all sides, but there are more on one side than another, could you thin the heavy side to bring it more balance?  If so, the tree will probably be fine.
·         Are branches growing straight out from the trunk?  The “perfect” fruit tree will have all of its main branches growing parallel with the ground close to the trunk.  This gives you lots of spread.  When looking at a young tree, you want to choose one that already has branches in this position, preferably on all sides.  Any branches that are growing straight up from the trunk should be pruned off.  If you are looking at a larger tree (4-5’), are the main branches spaced out on the trunk so that 2 branches in the same direction are not close to one another?  You want each branch to have space to grow, so avoid having branches right on top of one another.
·         Do the leaves look healthy?  Avoid trees with small brown spots on the leaves (especially apples) because it’s a sign of disease.  Also avoid trees with yellowing leaves.  They are often root bound/under nourished or diseased. 
·         Does it look like the tree has lost its leaves?  Are there empty leave nodes on the branches?  This can be a sign that the tree has dropped leaves due to stress.  Sometimes if everything else checks out, these trees will come back fine the next year.  Sometimes not.

If you are ordering trees through the mail or you live somewhere with an existing fruit tree, you’ll need to work with what you have.  Next week we’ll look at how to prune a fruit tree to create the structure described above(actually, this may end up in 2 weeks…we’ll see how wordy I get.  )

From 9/20/2012:
The time to prune fruit trees is coming up, so let’s talk about how to do that.  First, I would like to say that the best way to learn to prune a fruit tree is to go to a hands-on workshop.  Kansas City Community Gardens offers them as do a few other community groups.  You can also go to a local orchard and look at the structure of their trees.  We will be pruning our fruit trees this fall (probably in November) and anyone interested is welcome to come help.  In the meantime, here’s a general guide:
1.       Do any heavy pruning while the tree is dormant (Nov – March).  Light pruning can be done in Spring and Fall.
2.       Prune off any branches low on the trunk.  This is particularly true for anything growing below the graft line. 
3.       For a new tree, pick out your “scaffold” branches.  These are the main branches, one in each direction, that are spread out and mostly parallel with the ground.  Remove any non-scaffold branches from the trunk.
4.       If any branches come out of the trunk and are growing mostly straight up, prune them.
5.       If you want to keep your tree short (for a dwarf or pot grown tree, for example), prune the central leader at about the height you want the tree to grow to.
6.       Focus on the branches coming off of your scaffold branches.  Look for any branches that cross, especially if they are growing toward the center of the tree.  Prune until the branches no longer cross.
7.       Look for branches that are close together, especially if they are growing in the same direction.  Prune until each branch has space to grow.
8.       Look for “waterspout” branches.  These grow off of scaffold branches and grow straight up.  Either remove them or cut them off short.  These will try to become a new central leader if not pruned.
9.       Remember to leave first year growth – most fruit trees bear fruit on last year’s growth.

At this point, you should have a tree that looks very “open”.  Each branch should have good air flow around it and the tree should look balanced from all sides.  If you have an older tree that has not been pruned many years, don’t try to take it from its current state to the “ideal” look in one year.  It would be too drastic of a loss and could kill the tree.  Instead, focus on one part of the tree each year.  For example, divide the tree mentally into quarters.  Prune one quarter to an open shape the first year.  The second year, prune the second quarter and do maintenance pruning on the first quarter.  Continue on until the entire tree is brought back into shape.

Wednesday, September 19, 2012

More posts and boards

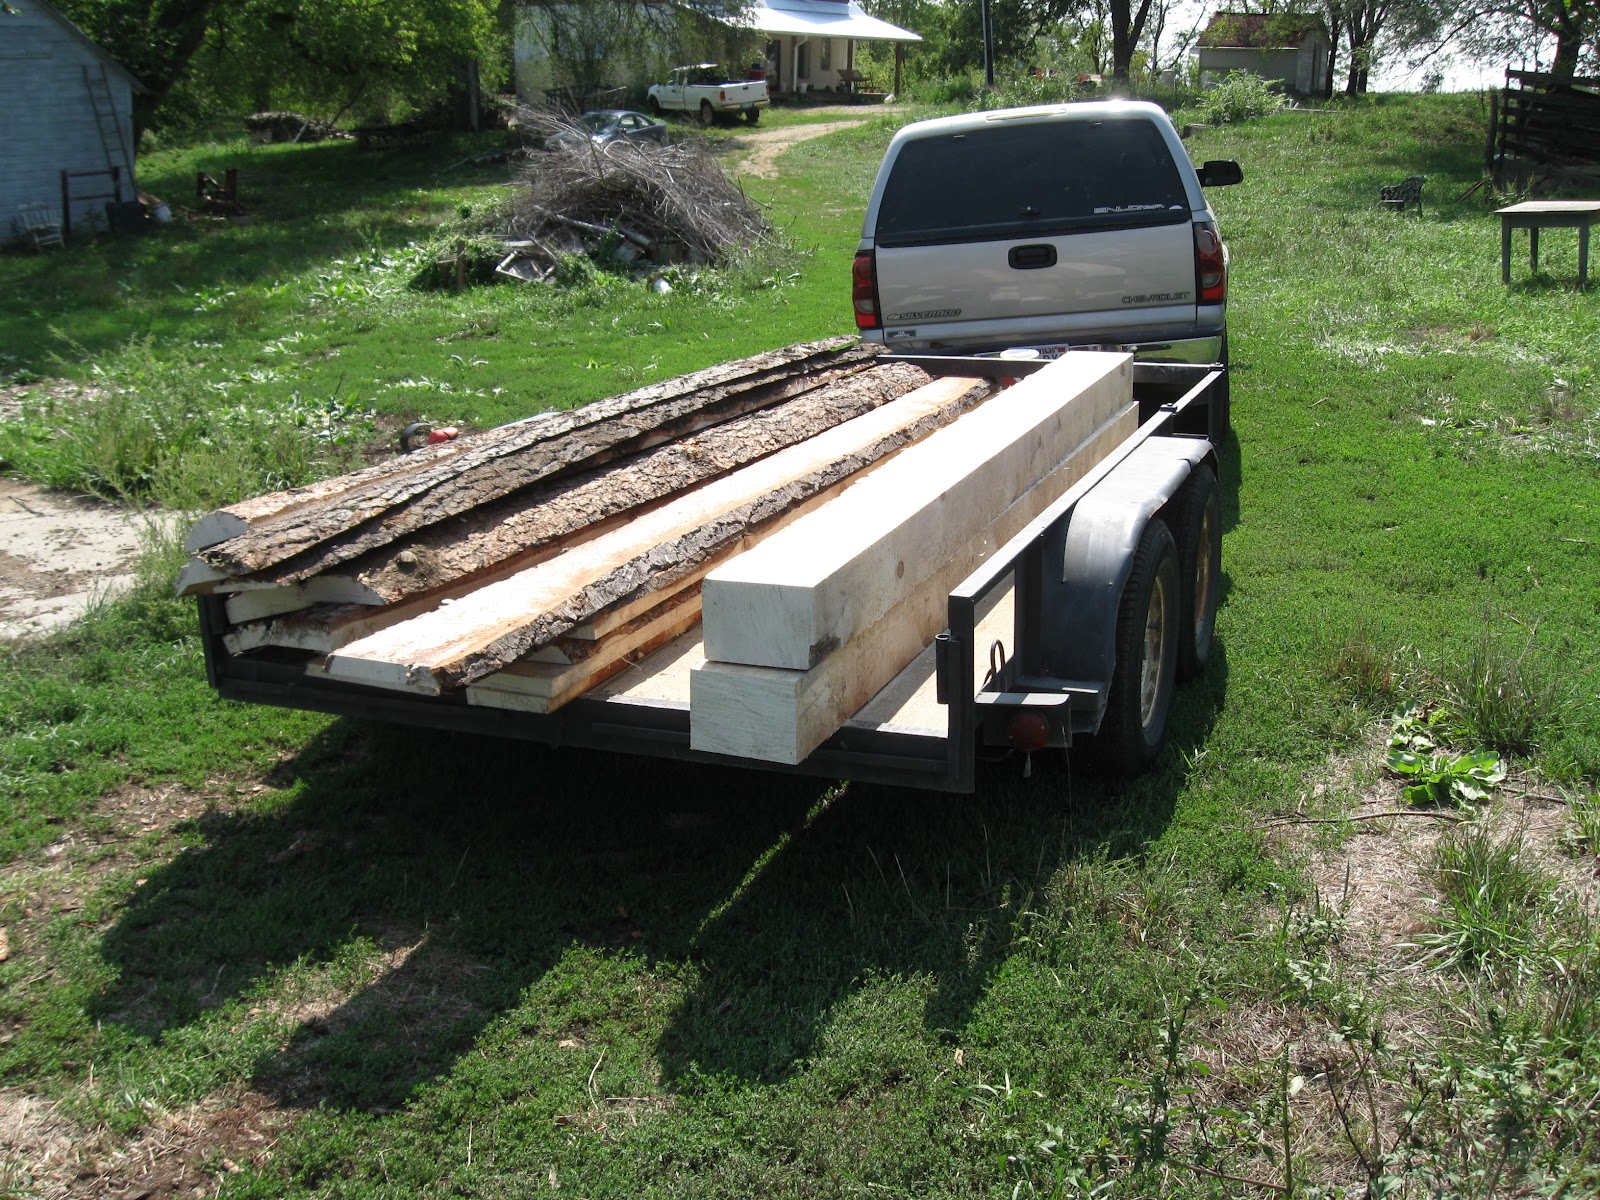
Monday, Jeremy and Tim milled a couple more logs into 2 more of our principal posts and several boards that will become roof decking.  We are only 3 posts from having all of our main posts ready to go.

Trailer loaded at Tim's

Stacked to cure in the greenhouse

In the bottom picture you can see 3 of the corner posts with 1-3/4" roof decking boards on top.  The very top layer is quarter rounds from the logs that we plan to peel and turn into siding.

We also heard from the miller in Colorado today.  He is well on his way and expects to be finished with the logs he has sometime next week.  Depending on exactly which timbers he was able to get out of those logs, that will put us somewhere around 3/4 of the way finished with the structure of the cottage/cabin. 

An update on my arm, for those who are interested:  I went to Dr. Chang in Lawrence.  He is a practioner of traditional chinese medicine (a combination of chiropractic, accupuncture and herbs).  He quickly figured out that one of the bones in my elbow had shifted and was putting pressure on a tendon.  He moved it back (no, that didn't hurt) which immediately made it feel better.  He also gave me some herbs to use topically to help the tendons heal where they were rubbed and inflamed from the bone being out of place.  Things are improving, but it will take a week or two before the tendons have finished healing enough for me to be back to normal-ish.  Until then, I'm figuring out how much I can do with 1 arm.  ;-)

Monday, September 17, 2012

Slowing down...for a bit

Back to school, work picking up for Jeremy and my elbow and wrist being messed up have all contributed to a general slowing down in the pace of work around here.  We're still moving, just more slowly.

This weekend, Jeremy and Daniel managed to clean out one of our storage units (where the greenhouses were stored).  We also did a bit of site layout and checked into getting a driveway put in.  That was about it.  At this pace, we might get the cabin done in 2016...  

Jeremy is milling today so there is progress on that front.  Hopefully my arm will heal up soon and we'll be able to move a little more quickly. 

Wednesday, September 12, 2012

Another block in place

Yet again, the gods of randomness have smiled upon us.  As regular readers will know, we had a minor accident in my mother's truck while moving logs in Colorado.  This week we finally had a time (and by "we" I mean Jeremy) to take it to a few body shops for estimates on repairs.  At the third and final body shop, the technician asks how the dent happened.  Given that the reason is fairly unique (jacknifed a trailer of giant logs), an interesting discussion ensued. 

Over the course of the discussion, the technician mentions that he has 5 acres of large cedars that he's clearing out.  Did we mention that the sill plates of the cottage will be made of cedar for the rot resistance?  Right, so Jeremy's ears perk up.  Local cedars would save us a lot of time hauling them from Arkansas this winter and given the price of gas would also save us some money.

Jeremy went to take a look at them tonight and found several that are big enough to be worth milling.  We will have to see if they will really be the right size for the sills or not.  If nothing else, we will be able to mill some cabinet thick boards to use for moth resistant closets and cabinets in the cottage.  We agreed to pay him to fell and limb the trees based on the size of log he gets out of it (more for thicker logs, less for smaller ones).  As a bonus, we may get some fence poles to use as we work on fencing the farm.  Here are some pics:

A sample tree that is about 12" in diameter

part of the cedar grove

Our new cedar supplier with one of the larger trees

Saturday, September 8, 2012

Checking in from the farm

We spent a good chunk of the day today at the farm taking care of loose ends.  We re-stacked all the lumber we've milled so far and got it weighted and banded to cure.  We also did some rearranging in the greenhouse and planned out where we're going to put the things that are currently in storage.  Here's how the lumber looks:
These will be floor joists, oak braces and misc. lumber.


The big beam is one of the 6 primary posts for the cabin.  The rest is just weight so it stays straight!


We spent some time weeding today and checking in on the garden.  The sweet potatoes have taken over their half of the retaining wall bed.  Hopefully the potatoes growing under the ground are as healthy as the vines above it!  There are several nice cantaloupe set on too.  With a little luck we'll have a few more tomatoes yet this fall for fresh eating.  I'm looking forward to having enough to can next year - we're out of homemade salsa and spagetti sauce already. *sad*  The strawberries are multiplying with a bit more vigor since the heat broke and the fruit trees we planted all seem to be doing well.  Overall, we have no complaints.

The field of green is all sweet potatoes!

For our afternoon fun, we worked around the house to get ready for an open house tomorrow.  We finally loaded up our old potting desk (repurposed from work years ago and long past its prime) and the former trash can shed (it was falling apart).  The whole house got a good straightening up and cleaning too.

Lest anyone think it was all work and no play, we took the kids for ice cream (frozen custard, actually) and watched a movie before bed.  It was a great day.  We hope yours was equally good!

Thursday, September 6, 2012

More milling!

I have a feeling we'll have a lot of posts with that title...

Jeremy spent 3 hours milling with Tim yesterday and produced most of our braces for the cabin and one of the posts (a 7"x10"x12' timber).  He also managed to move and restack all of that plus some other wood at the farm all by himself!  He impresses me constantly with his strength and determination.  No pictures were taken though, so you'll have to wait to see the results until we get back to the farm with a camera.  The stack of milled lumber is growing steadily!

Due to work schedules and school starting, things will be moving at a more scattered pace.  We will be creating our grape trellis, planting our front hedgerow and continuing to move rock and mill logs through the fall.  At some point when the weather gets too cold to work outside much, we'll shift and start doing the joinery for the cabin.  Lots in store, just not lots to report today. 

Sunday, September 2, 2012

Family and Oaks


We went to northern Arkansas to visit my grandmother for Labor Day.  We enjoyed time with lots of extended family, wonderful food (thanks for smoking the meats, Jeremy!) and some fun games.  We also managed to collect a few more pieces of the cottage. 
Before we left on Sunday, we went down to the family farm to get an oak log for the cottage.  Hardwoods serve an important purpose in a timber frame because of their durability and strength.  This is particularly important for the corner braces in the frame that must resist the sideways force of the wind and for the pegs that must hold every joint solidly.  We are very fortunate that the family farm (owned and farmed by my uncle, Dwayne) has many good sized oaks of several varieties.  We are also fortunate that Dwayne didn’t mind us harvesting one for our braces and pegs.

The adventure started easily enough.  Jeremy, my cousin David and his wife Angie, and I followed Dwayne and my aunt Janelle back into one of their fields where we found a tree that would work well.  It was a post oak and we were able to bring home 2 logs from it that should make all of our braces and pegs for the cottage.  While we were there, we identified several large cedar trees in the adjacent field that are large enough for us to cut our sill timbers out of them.  Cedar sills are ideal because the wood will resist any moisture that may come up through the foundation stem wall.  The trees in question are in the middle of the field and Dwayne would like to have them removed.  That works out well for everyone.  Unfortunately, we didn’t have enough time or energy to cut them on this trip.  That will have to wait for the next time we’re in town. 

Here's the tree as we found it

Timber!!
 
After limbing the trunk, we drug it out of the brush

Thank goodness for tractors to move logs...

A few fine adjustments later and...

we were ready to strap the load down for the trip home!