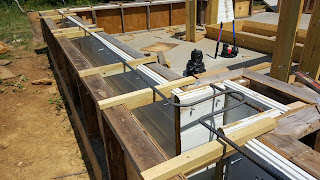
1. Set up forms that are the width of the wall apart. In our case, we also cut and fit 2" thick sections of insulated garage door panels on the interior of the form to be our insulation. You can see the roofing screws we imbedded in them so that they would hold in the wall.

2. Place wooden spacers at the top and bottom of the forms to set the width of the wall.
3. Drill holes at the top and bottom and run wire through both sets of forms. Then tighten the wire ties by twisting them with a nail. This cinches the forms snug around the spacers and the wire will hold the forms the right distance apart once we pull the spacers out.
4. Cut and bend rebar to run horizontally and vertically in the wall. Our vertical rebar is tied to bolts in the foundation. Each lift of the forms (2') gets a layer of horizontal rebar. Thank goodness we picked up a rebar sheer and bender years ago at a yard sale! I can't imagine doing this work without it!
5. Lay out the stone. Since we are working with fairly large stones, we can't just start placing them in the wall and find the right rock as we go. Instead, we play really heavy tetris all the way around the building. We took the time to put some nice, long stones around each doorway and plan to do the same around the windows. We are also picking larger stones in a pattern for the corners so that they look "keyed" when we're done. That's the plan anyway.
6. Start mixing concrete! We are using shredded Styrofoam in place of the gravel in a normal concrete mix. The recipe is 1 part Portland: 2 parts sand: 3 parts shredded EPS. It mixes up to a pretty reasonable mix that should have around R 1 per inch. That plus the R13-17 of the garage door panel gives us an R25 or so wall with no air gaps as long as we finish the windows and doors well.
7. Put down a bed of concrete and start placing stones. This is what the first section of forms looks like now that it is full. We'll see what the faces look like once we take the forms off.


It feels amazing to finally be working on the walls! It has been 3 years of prep work to get to this point as we work around our regular lives. Here's hoping it doesn't take us 3 more years to move in!


No comments:
Post a Comment