Monday, December 5, 2016

Finishing the walls!

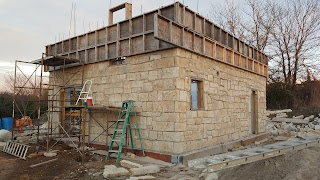
As of about 5:00PM on Sunday, December 4, 2016, the stone walls are done!  Here's the rest of the story...

On Monday, 11/28, we filled the second lift on the east gable. 

Jeremy and Matt Jolley working on the wall (I mixed concrete)
 

On Tuesday, Matt and Jeremy moved the forms up and finished the east wall (woo hoo!).

Completed east wall

At this point, we knew we were under the gun.  The forecast was getting colder and our window for getting concrete to set up properly was getting really narrow.  We had 3 lifts to finish on the west wall before it got really, really cold.  Because of that, Jeremy worked after dark to get the rocks cut to fit under the roof line Tuesday night.

Jeremy working by headlamp to cut rocks


On Wednesday, Jeremy, Matt and Tucker Saunders set up the forms for the first lift on the West wall and got the first 2 sections filled.  It was a very long day in the wind and cold.  These guys are my heroes!


Matt covering the new stonework for the night
 
On Thursday we didn't work on the house because of the cold weather.  Friday, Matt, Tucker and Jeremy were back at it first thing in the morning.  They finished the lift and got the forms set for the second gable lift.
 
Wrapping up for the day Friday
 
Saturday morning we were all working by 9AM to finish the second gable lift.  We hoped to get the forms set for the last lift before the day was done, but we didn't quite make it.  Fortunately, the weather was mild and not windy.  Matt brought his son, Sebastian, out too and he, Tucker and Catherine had a good day working with us.  We finished the day with the second lift done and the forms staged for the last lift.
 
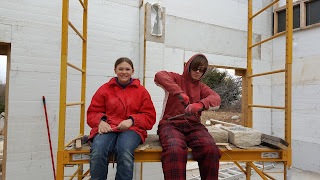
Catherine and Sebastian making wire ties
 
Sunday was the day.  The forecast was calling for single digit lows on Wednesday and we needed the concrete to have as much time as possible to set up before that.  We had to finish the last lift before the day was out.  We started on the wall about 10:00 and finished about 4:30.  It was grey and cold the whole day but we had to get it done. 
 
The peak is particularly challenging because all the rocks have to be custom cut to fit under the roof pitch and the sill plates have to be set precisely.  It took an inordinate amount of time to get that little triangle done, but we wrapped it up about 4:30.  The very last thing we did was build and pour the pedestal that the center post sits on in the center of the house. 
 
Jeremy on the wall with me at the start of the day

The view of the kids making concrete from the top of the scaffolding

The pier in the center of the house


And so, almost 4 months to the day from when we took the forms off to look at the very first lift, we put the last stones in the wall.  We began this journey in July with Jeremy and I casting the very first corner.  It has been a tremendous joy to work with my family on this house and it was very appropriate and poetic that it was just us there to set the last stones. 


Family picture with the completed wall
 
Throughout this building project, Catherine has been stuck with an almost invisible but incredibly important job - making wire ties.  These little bits of twisted wire sit under every rock in the wall to give it that much more grip in with the rest of wall.  Over the house project, she made literally thousands of ties.  Here she is with one of the last batches.


I can't write a post about finishing the stone walls without saying thank you to a lot of people though.  Matt Jolley has been a life saver giving of his time and experience to get us through these last lifts.  Tucker Saunders has been clutch and invaluable with his constant positive attitude and willing to do whatever needs done.  Chris Kesslering gave up his days off to come out throughout the project throughout.  To all the folks who came out for a day or two - Susan Pauls, Nancy Ward and family, Scott Dunn, Doug Dubois, Sara Lehrman, Tim O'Brien - thank you for helping us through some tough days.  Scott Dunn gets a call out for welding our door lintels late into the night so that we could keep building on schedule.  A special thank you goes to Tim O'Brien and Otto Lehrman for loaning us scaffolding.  I have no idea how we would have done this without it!  Thanks to Erin Schmidt for taking the kids to school and bringing them home so that Jeremy could get a few extra hours in each day.  This was really a community effort and we appreciate everyone who pitched in.  I'm sorry if I missed anyone, but know that we are deeply grateful for all of you! 


Beginning the gable ends

It has been a busy few weeks of work on the house.  As the weather gets colder, we are doubling down to try and get the concrete/stone work done before it gets too cold to do it.  We also crossed another milestone - we have water at the job site!  The water line finally got put in and the septic is due to be installed sometime in the next couple of weeks.  It is wonderful to not have to haul water anymore!

The first running water at the house site!


We started moving forms up for the last full lift on the 14th.  As the work gets taller, everything takes longer.  We are tremendously grateful for the loaned scaffolding that is enabling us to do this work at all.  There's no way we'd get it done with ladders!
Setting up the last lift!

With the forms set, we started pouring on the north wall on the 16th.  This was particularly exciting because this lift finished the north wall!  We set bolts in the wet concrete to hold the sill plate and screed the concrete as level as we could.  It felt amazing to actually have a wall completely done!

 
Forms up for the last lift


We spent Thanksgiving weekend continuing the work.  We finished the lift on Friday and set the forms for the first lift on the East gable end.  With completion of the South wall, we have 2 walls completely done!

The north wall revealed!

Working on the first lift on the east gable


On Saturday and with the help of my brother and his daughter, we managed to finish the first gable lift.  This introduced some new challenges.  The rocks on the edges are cut to match the roof slope and we have to continue setting bolts for the sill plate along the angle edge.  Our solution was to set the first layer of sill plate with the bolts already installed in smaller sections.  The second layer will be continuous to tie it all together.  At this point, the working platform is a solid 12 feet in the air and every bucket of cement has to get pulled up on the end of a length of ratchet strap, emptied and then tossed back down.  We are like a little hive of ants running around moving materials up to the wall and then cycling them back down again!

Moving materials up the scaffolding


Sill plates on the gable end


Sunday was mostly a day to rest due to rain, although we did start setting the forms for the second gable lift (of 3).  One more pair of forms to set in the morning and then we'll spend the rest of the day laying stones.  With a little luck and a lot of work, we'll get that lift done and be on track to finish the East wall on Tuesday before the weather turns on us.


Keep your fingers crossed that we get 3 or 4 more days of decent weather yet this year to finish the stones so that we can keep going.


Tuesday, November 8, 2016

A successful work party

Last Saturday we were fortunate to host a work party to help us get the 6th lift complete and get the walls to 12 feet tall.  We started the day with help from Matt Jolley and his son, Sebastian, on the wall and the mixers at sunup. 

The sun is rising and Jeremy and Matt are already putting rocks in the wall

Jacob and Sebastian ran the 2 mixers for the morning.  Jeremy and Matt stayed on the wall.  We had another family come help around 9:30, the Wards (Nancy, Mark, Stewart and Electa), and the 4 of them divided up between helping get materials on the wall, sand around rocks and filling buckets of materials for the mixers.  Susan Pauls arrived a little later and jumped right in too!  We kept a good system going and managed to finish the rest of the west wall and all of the south wall in a little over 3 hours!

Electa and Stewart on the left, Jeremy in the middle, Mark and Matt on the right.  Everybody on the South wall!!


Unfortunately, after our lunch break around noon, the Wards had to leave.  We scaled down to 1 mixer and Amber started mixing.  Susan was a huge help until she had to leave at 3 or so and we finally finished the East wall as the sun was setting. 

Susan filling sand buckets for the mixer (Amber)

Putting the finishing touches on the East wall.


As a bonus (that I forgot to take pictures of), my cousin Jessica Bartlett came up to visit too!  It was amazing to get to see her again.  I only wish I'd had more time to talk and catch up.

We are officially 12 feet tall!  The process of moving forms up for the final full layer has already begun and continues all this week.  We are racing cold weather and pushing to get the stonework done!

Thursday, November 3, 2016

Building update - 10 feet tall!

Sorry for the radio silence - we've been pretty focused on the stonework for a while now.

When we last left the story, we were at 2 feet tall.  As we were enjoying the first 2 feet of stonework, we started working out how we were going to move our forms up the wall.  We quickly realized that the easiest thing to do would be to make another set of forms (so 2 complete sets) so that we could always stack the new form on top of the one we just filled.  Since each layer is wired into the wall, as soon as the concrete sets up it is locked in place.  That way we don't have to create some kind of stilts to prop up the forms while we lock them in.  So, we stopped and spent a week building a second set of forms.

This time, we made almost all of them without the plywood face.  All of the new forms then went on the inside of the building where we have garage doors to stop the concrete from coming in.  This saves a TON of weight when moving the forms up and made assembling the new forms go much faster.  Then we had to re-set the original forms around the stonework we had just completed so that we could stack the new set on top of them.  From there, we have been leap frogging forms up the wall!
Setting up the second lift

We have found that we can do approximately 1 linear feet of stonework per person working per hour..  That means that one 2 foot lift around the 104' of perimeter wall for the house takes about 100 person-hours of work to complete.   It takes an additional 60ish hours to cut the garage doors, move the forms up, level them and lock them in place.  That brings the total labor required per lift to around 160 hours.  There are 7 full lifts in the house, so you start to get an idea of how much of a time commitment it is.


You can see the stones sitting over the forms where we finished the first corner to 4 feet tall.

The first couple of forms set up for the third lift

The inside of the house set up for the third lift.  You can see the open front forms here.

Our amazing friend, Doug Dubois, came out to help us get to 6 feet tall!

Jeremy carefully lays out every stone on the ground before it goes in the wall.  We call it the county's biggest game of tetris.

Forms up for the 4th lift

We put steel headers over every door and window to help support the stonework.  Here they are primed and ready.

Setting forms for the 5th lift.

Inside of the house at 10 feet tall.  You can see the stones sticking up where we've already filled the forms for this lift.

Moving forms up for the 6th lift!

Another amazing friend, Matt Jolley, came out to help us get the first wall to 12 feet tall.

We were profoundly fortunate to have scaffolding loaned to us first by a neighbor and then by Jeremy's grandparents.  I hate to think how much harder it would have been without the platforms!  We currently have use of both sets and that is making the work go well, although it still gets harder the higher we go.  We currently have about half of the wall up to 12 feet tall and we hope to get the rest of it done this weekend.  Then we can start setting up for the last full lift!  Keep your fingers crossed for us!

Sunday, August 7, 2016

Slipform Stone Masonry - finishing the lift

I posted a bit ago about how we set up the forms and fill them for the slip form walls of the house.  Since we just completed the first lift and took off the first forms, I thought I'd update with a little more detail about how filling the forms goes.

After you have the forms braced and tied together, you have to put a layer of sand along the front of the wall to keep the concrete from flowing all the way to the rock face.  This makes pointing much easier later.


Then you fill the bottom up to the level of the sand with concrete.  This is the mortar bed that the rocks will sit on.  The first line of rocks is next.  Once they're in place, we go back along the wall and put sand in between them and along the face above them so the concrete stays back and doesn't flow over the face of the stones.


With the sand in place, we fill up the form with concrete to the height of the rocks plus the sand on top.  This step takes a lot of concrete!  Thankfully, the kids have gotten really good at mixing concrete.


Then you continue with that pattern - sand, concrete, stone, sand concrete, stone - until the form is full!  The concrete needs to set for 24 hours before you can take the forms off and look at your hard work.  We did that today and this is what it looks like!


We learned a lot from this first lift.  We didn't put sand between all the rocks at first and got too much concrete around the faces.  We also learned a lot about placing wire ties in the wall so that they don't interfere with the rocks.  We had to cut several of our initial wire ties because they were in the way of the stone work.  Bit by bit, we get better.

On the positive side, we discovered that the 4 of us can do about half a lift in a day of work.  That's not too bad!


Tuesday, July 19, 2016

Catching up - Joinery!

I'm going to try and catch up a few of the bigger things that have happened in the last couple of years (LOL) relating to the farm and building the house.  Today, I'm going to talk about doing the joinery. 

As some of you may know, we have been working on the house for going on 3 years now.  One of the many challenges we faced once we got all the timbers to Kansas was how to protect them from the weather while we worked on them.  Naturally, last summer was one of the wettest we've seen which means having to move and re-level every beam every time Jeremy wanted to work on it.  Progress was exceedingly slow and we clearly needed a better solution. 

Luckily, we have an extra hoop house laying around!  We put up about half of the 30'x96' hoop house over the slab and covered it with an old piece of plastic from our other hoop house.  This gave a sheltered place for Jeremy to work where the beams could stay out as long as he needed them to.  Progress accelerated dramatically! 


Over the course of the fall, winter and into the early spring, Jeremy completed all the beams for the house, an addition and a barn!  Go Jeremy!  Here are a few of the pictures we took along the way.


Checking fit on the top post

Timber splice in the ridge pole.
Part of the second floor test fit before sanding

 Sanding the floor joists

Tools of the trade!  Wooden mallet and hearing protection.

One of the rafter beams assembled with collar tie


First floor post with summer beam
Jeremy admiring his handiwork in the hoop house


Once the joinery was done, we had to get ready to actually build the house, so the hoops had to come back down.  That took a couple of days to do. 

First, we pulled the plastic off and folded it up

Then we started taking apart the poles

Then everything gets loaded on the trailer

And then it gets unloaded in a new place

And here it will rest until we need it again!


Then we had to move all the beams off the slab so that we could start setting up concrete forms.  Thank goodness for good friends!  We managed to move them all in a day and get them stacked up by type near the building site.  I can't wait until we're digging them back out to put in the house!

Started with piles on the slab

Then the piles moved here!

And every one was picked up by hand.

And moved, stacked, stickered and leveled.

The moving crew (minus me - I took the picture)!


Then we were ready to start building door and window bucks and setting up forms.  I'll save that for a different post.